idea to make windmill
see step by step with images. how you can make a windmill here:

For the mill we need only thick cardboard, approximately 1.5-2 mm thick, pencil, ruler and a knife. To begin cut out a rectangle 19h10 see note on the larger side a point at a certain distance, hold the line. In the photo are the dimensions:

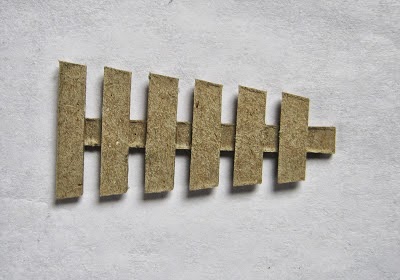
Cut the cardboard lines. So we get 6 wedges, it is the basis of the mill itself. Take 2 wedges, are putting together as close as possible and fasten masking tape:

Likewise, attach the other Circuits, it turns out that’s such a “skirt”:

To one side of a piece of paper glue. I have this ordinary A4 paper scrap.And connect the two sides of the design by this paper:

Then take a small square of cardboard, make the foundation of the mill. At the same time it will balance the entire structure and consolidate it. To this end mills coat with Glossy (I think so more strongly)) and glue on cardboard, while trying to get a flat hexagon) View from above:

Remains excess cardboard edges. After the glue dries cut off with a knife or scissors, whatever you like:

Now you got a bottom plate:

Then proceed to the plank)) For convenience, I immediately drew all boards. Board width 1 cm in length – from 2 cm to 3.6 cm

To avoid confusion, I cut and pasted their boards to the base at a time, starting from the top, with the little ones. Glue at the time of crystal, the distance between the planks about 1-1.5 mm. That’s what happens in the end:

In order to hide the ugly corners of the mill, cut strips of thick paper. Strip thickness about 8 mm, length 10 cm For convenience, I first drew all the bands in the middle of each line held sheepishness handle, which is easier to bend. Flex strips better once because small parts difficult to bend, and then later cut:

Cut strips and glue them to the corners of the mill:


see step by step with images. how you can make a windmill here:

For the mill we need only thick cardboard, approximately 1.5-2 mm thick, pencil, ruler and a knife. To begin cut out a rectangle 19h10 see note on the larger side a point at a certain distance, hold the line. In the photo are the dimensions:

Cut the cardboard lines. So we get 6 wedges, it is the basis of the mill itself. Take 2 wedges, are putting together as close as possible and fasten masking tape:

Likewise, attach the other Circuits, it turns out that’s such a “skirt”:

To one side of a piece of paper glue. I have this ordinary A4 paper scrap.And connect the two sides of the design by this paper:

Then take a small square of cardboard, make the foundation of the mill. At the same time it will balance the entire structure and consolidate it. To this end mills coat with Glossy (I think so more strongly)) and glue on cardboard, while trying to get a flat hexagon) View from above:

Remains excess cardboard edges. After the glue dries cut off with a knife or scissors, whatever you like:

Now you got a bottom plate:

Then proceed to the plank)) For convenience, I immediately drew all boards. Board width 1 cm in length – from 2 cm to 3.6 cm

To avoid confusion, I cut and pasted their boards to the base at a time, starting from the top, with the little ones. Glue at the time of crystal, the distance between the planks about 1-1.5 mm. That’s what happens in the end:

In order to hide the ugly corners of the mill, cut strips of thick paper. Strip thickness about 8 mm, length 10 cm For convenience, I first drew all the bands in the middle of each line held sheepishness handle, which is easier to bend. Flex strips better once because small parts difficult to bend, and then later cut:
Cut strips and glue them to the corners of the mill:

Now proceed to the roof! Cut a rectangle of cardboard 11h5 cm, divide into 3 parts – 3, 5, 3 cm with smaller parties midway mark and draw just such a thing:

Trim the edges, fold Bigou lines, triangles turn down, it turns like this:

For the roof cut out another rectangle 11h5 cm, folded in half:

Coat with all the ends neatly glosses, and glue on top of the roof:

Now again the board!)) Making 10 planks width again 1 cm, length 5 cm

Glue them from the bottom up:
In order to hide the ends, again cut a strip of heavy paper. Width of the strip again about 8 mm., Length 6 cm strips again bend in half, glue, exactly along the bottom edge. Top left tail, cut off the excess:

Here all four sides already plastered, excess clipped:

The final touch for the roof – cut a strip of paper 5.1 cm long, 1.4 cm trichinosis folded in half and glue on top of the roof:

Roof ready! We stayed the last element – the blade. Cut a rectangle 3h8.5 see again draw wedges, dimensions on the photo:

Separately cut a strip of cardboard length of 6 cm, width 5mm. This is the basis of the blade. Each wedge is cut into strips of 5 mm. and begin to stick them (also at the time of crystal) on the basis of the longest to the shortest. The distance between the planks of about 3 mm. It turns out like this:
When all 4 blades ready, cut out of cardboard cross on which they will be attached. For this I drew here is a square, cut the excess:

Glue the blade from the middle back down about 5 mm.:

Here everything is ready

Now we just have to paint all the details, put them together and decorate, like so:

ليست هناك تعليقات:
إرسال تعليق